12
Saddlehorn Hamlet
James H. Kleidon
Contents
- Pit Structure and Courtyard Areas (Sampling Strata 2 and 3)
- Probability Sampling Units
- Sampling Unit 111N/95E
Sampling Units 105N/103E and 106N/103E
Sampling Units 109N/103E and 109N/104E - Wall Tracing
Saddlehorn Hamlet Summary and Conclusions
Introduction
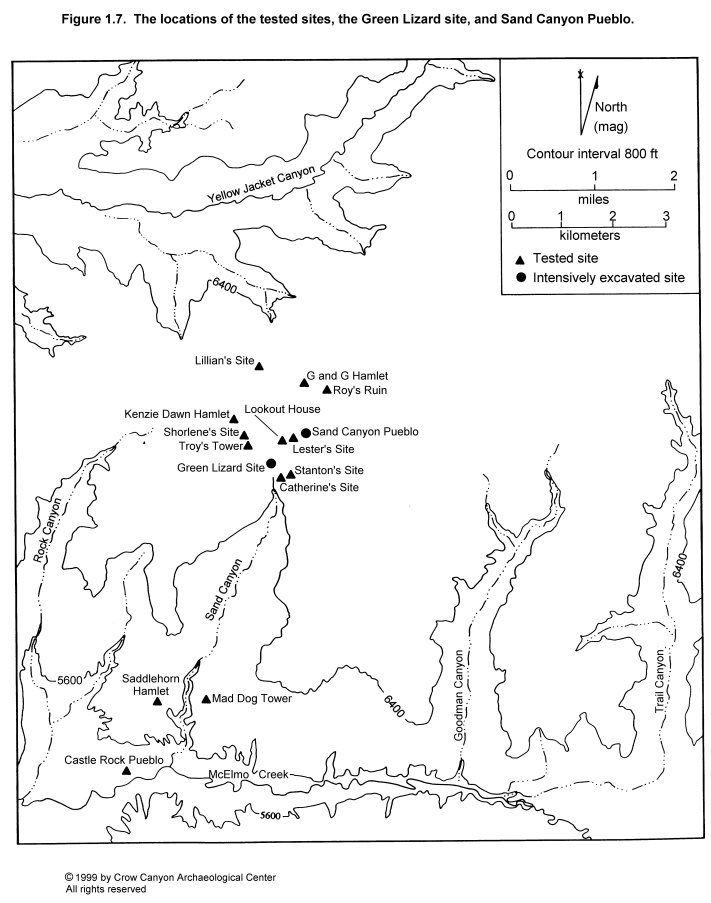
Saddlehorn Hamlet was recorded as Site 5MT262 in 1965 during an archaeological survey undertaken by the University of Colorado Mesa Verde Research Center in lower Sand Canyon. In 1975, the Mesa Verde Research Center, under the supervision of Curtis W. Martin, conducted a ruins-stabilization inventory of the Sand Canyon area (Martin 1976). Martin assessed the stabilization needs of Site 5MT262 and sketched a map of the two rooms in the overhang. The most recent work prior to the Crow Canyon Archaeological Center excavation was a formal Class III intensive survey undertaken by Native Cultural Services in 1988 (Gleichman and Gleichman 1989). The site was excavated in 1990 by the Crow Canyon Archaeological Center as part of the Sand Canyon Archaeological Project Site Testing Program.
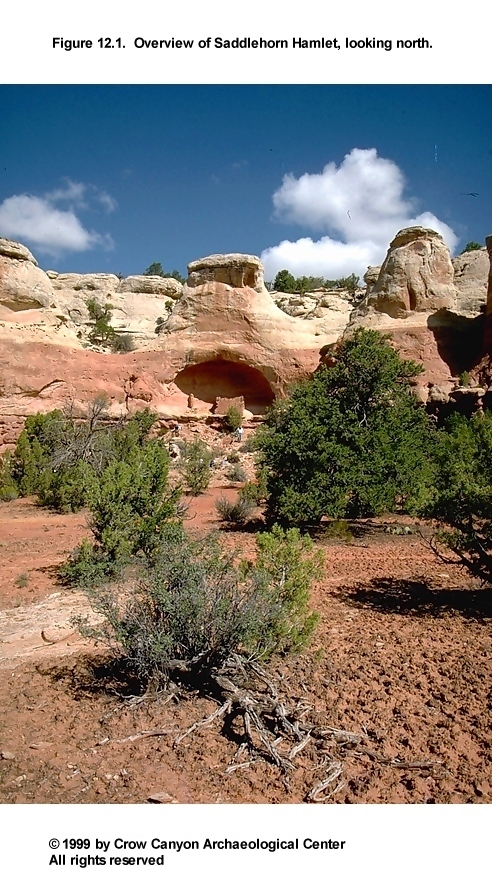
Saddlehorn Hamlet is at an elevation of 1769 m (5800 ft). The site lies on the first terrace of Sand Creek, which is located 475 m to the west (Figure 1.7). The site is located in an alcove in the Entrada Sandstone and in front of the alcove at the base of the cliff (Figure 12.1 and Figure 12.2). The land below the alcove has a south to southwest aspect and slopes approximately 15 degrees in that direction. Remnants of probable towers are present on the cliff top 30 to 40 m above the alcove. Nearby vegetation consists of a pinyon-juniper woodland with prickly pear cactus, saltbush, and sagebrush covering most of the site. Historic-period land use included grazing. Unfortunately, looting of the site has also taken place.
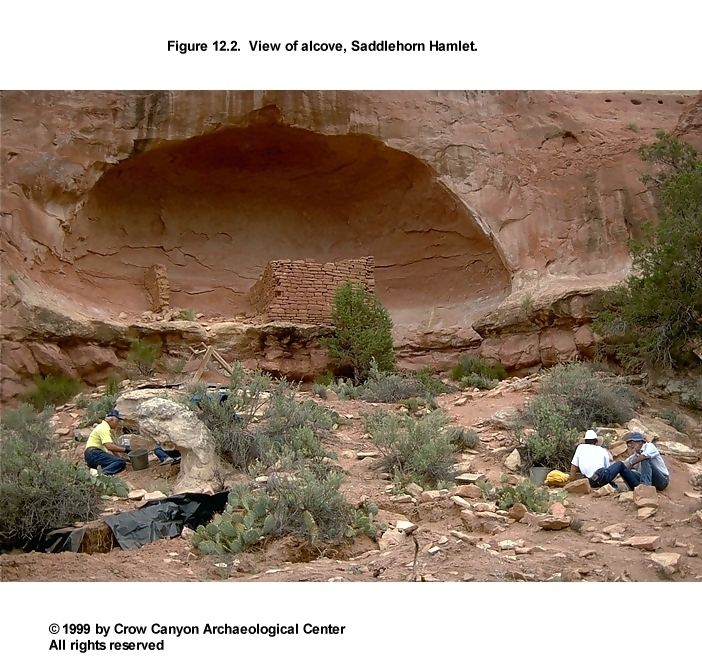
Surface remains mapped at Saddlehorn Hamlet prior to excavation consist of two masonry rooms in the alcove, one still fairly intact (Figure 12.3). The remains of two dry-wall structures and the base of an isolated wall are also present on the cliff top above the alcove. Surface evidence at the base of the cliff includes sandstone rubble from wall collapse. This rubble lies directly below the alcove and toward the northeast end of the site. Farther downslope is a mounded area of darker soil covered with a relatively dense artifact scatter indicative of midden deposits. A large area of this midden had been vandalized.
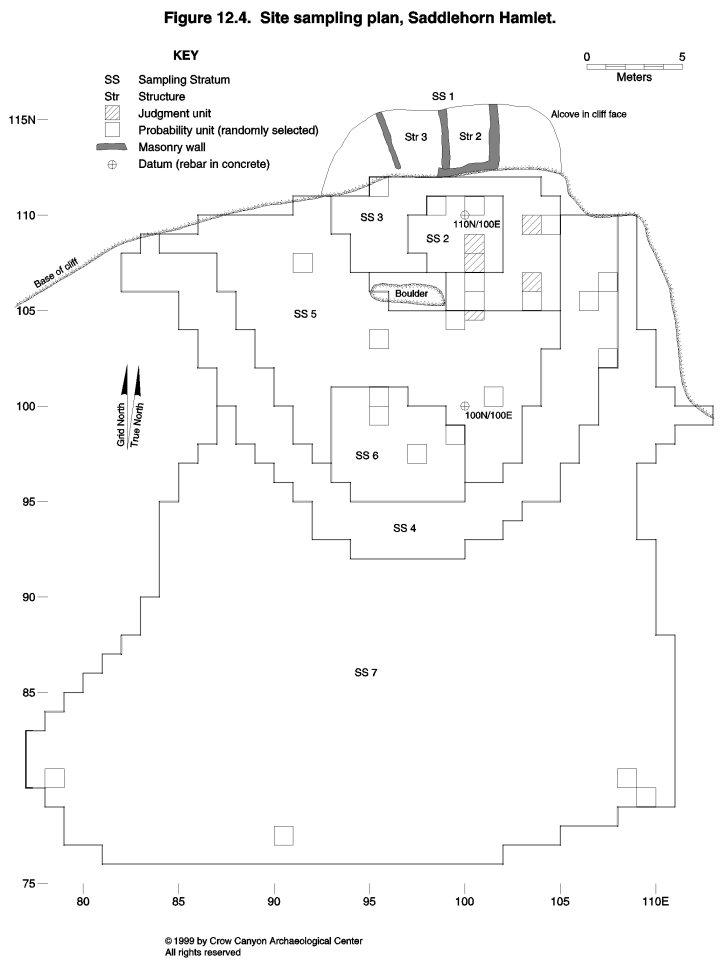
The sampling strata at Saddlehorn Hamlet were defined as follows (Figure 12.4). Sampling Stratum 1 includes the masonry rooms in the alcove. This area was excluded from the sample because the rooms in the alcove were too fragile for excavation and the sediment inside them was very shallow. Surface evidence of rooms below the alcove was not noted when the site was mapped.
Although surface evidence for a pit structure at the site is minimal, one was assumed to exist on the talus slope in front of the alcove. Sampling Stratum 2 was assigned to that area.
Sampling Stratum 3 is the courtyard stratum, which surrounds the pit structure stratum. Sampling Stratum 5 is the midden sampling stratum, which is defined by a darker soil color and the most dense artifact concentration on the site. It includes the talus slope to the west of the pit structure and courtyard strata.
The inner periphery sampling stratum, Sampling Stratum 4, surrounds both the midden and the courtyard strata. The surface artifact scatter in Sampling Stratum 4 is lower than in the midden but higher than in the outer periphery. No indication of architecture exists on the modern ground surface within the inner periphery. Sampling Stratum 7, the outer periphery, surrounds the inner periphery and extends to the site boundary as defined by the light surface artifact scatter.
An additional stratum defined the area of the midden that had been recently looted. This area was refilled with the backdirt from the looter's excavation and designated Sampling Stratum 6.
Twenty-two randomly selected sampling units were excavated at Saddlehorn Hamlet (Figure 12.4). In addition, five judgmentally located sampling units were either partly or completely excavated to facilitate the excavation and interpretation of the randomly selected units. Finally, limited troweling and sweeping were used to locate walls associated with additional surface rooms east of the pit structure.
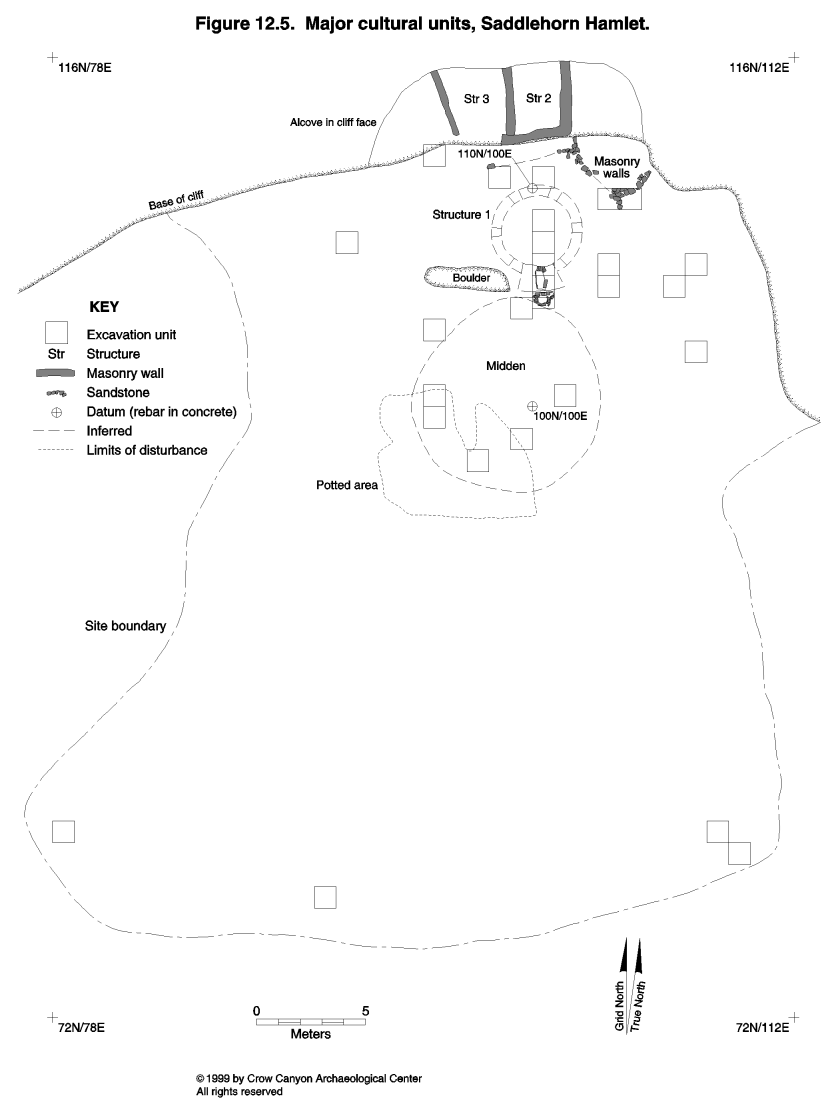
Figure 12.5 illustrates the cultural units defined by the Testing Program. These include a pit structure, a midden, and wall lines associated with surface structures. These features indicate that Saddlehorn Hamlet functioned as a habitation site.
The grid at Saddlehorn Hamlet was orientated toward the wall alignments visible in the rooms in the alcove. This grid is eight degrees west of true north. Vertical Datum A was located at 100N/100E and arbitrarily assigned an elevation of 100 m.
The following descriptions document all excavated units. In addition, the unexcavated structures in the alcove and those on the cliff top above the site are described. The descriptions are organized by sampling stratum. Cultural study units (for example, structures) are described first, followed by descriptions of the sampling units that are not in structures.
Alcove Rooms (Sampling Stratum 1)
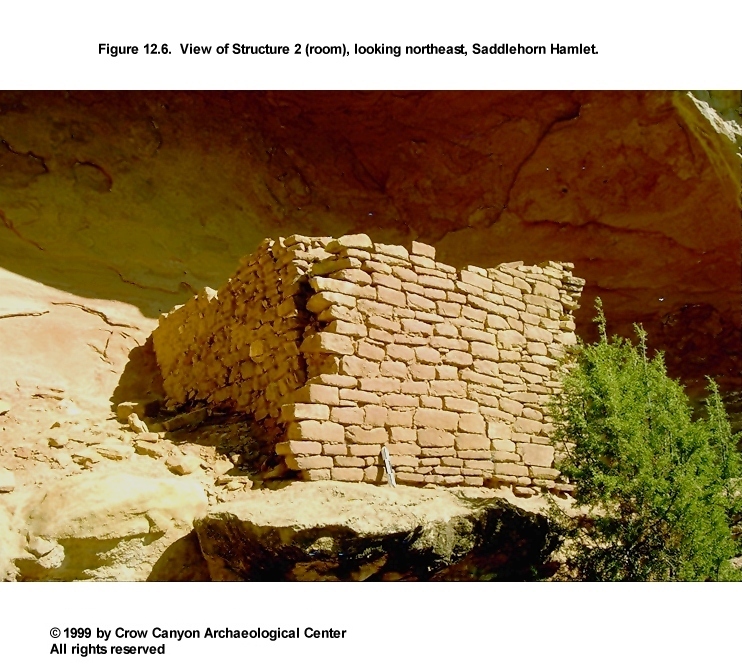
Structure 2
Structure 2 is the easternmost of two rooms in the alcove at Saddlehorn Hamlet (Figure 12.5 and Figure 12.6). Structure 2 measures 2.44 m long by 2.15 m wide at the base of its interior walls, providing nearly 5.25 m² of floor space. The highest section of wall still intact stands 2.21 m above its bedrock foundation. The average thickness of the three walls that make up the room is 36 cm. The back wall of the alcove forms the north wall of Structure 2.
Construction
Walls. The three walls that form Structure 2 are constructed of semicoursed sandstone masonry that rests on the bedrock base of the alcove. The walls are compound in cross section, consisting of both single- and double-stone masonry with tie stones. Sandstone rocks used in the walls are both shaped and unshaped. Shaped stones were usually pecked into blocks, but some were also flaked into tabular shapes. The visible exterior faces of the south and east walls and the interior face of the west wall are constructed primarily of well-shaped pecked blocks. The other sides of the same walls consist mostly of unshaped sandstone of various sizes, although half of the interior of the east wall contained pecked-block masonry. The mortar used in all the walls was a reddish yellow sandy clay. This same sediment is found on the modern ground surface within 100 m of Saddlehorn Hamlet. Mortar joints averaged about 2 cm wide, and sandstone-spall chinking was observed in many parts of the wall faces.
Because the room was not excavated, no floor features were identified. Features were observed in the walls, however. These include a possible doorway, a wall niche, and posts. These features are described below.
Feature 1 (Possible Door): An opening in the structure's east wall suggests either natural collapse, vandalism, or a doorway into the structure. The missing section of wall measures about 60 to 70 cm wide and is just over 1 m high. The base of this opening is located 1.03 m above the bedrock foundation of the Structure 2 walls. If this was not the location of a doorway, the room would have been entered through the roof.
Feature 2 (Niche): This wall niche, located in the interior face of the east wall, measures 17 cm by 12.5 cm and is 17 cm deep. The base of this niche is located approximately 1.5 m above the bedrock foundation of the room. The south wall of Structure 2 forms the south wall of the niche. The interior of the niche has no fill and is lined with adobe.
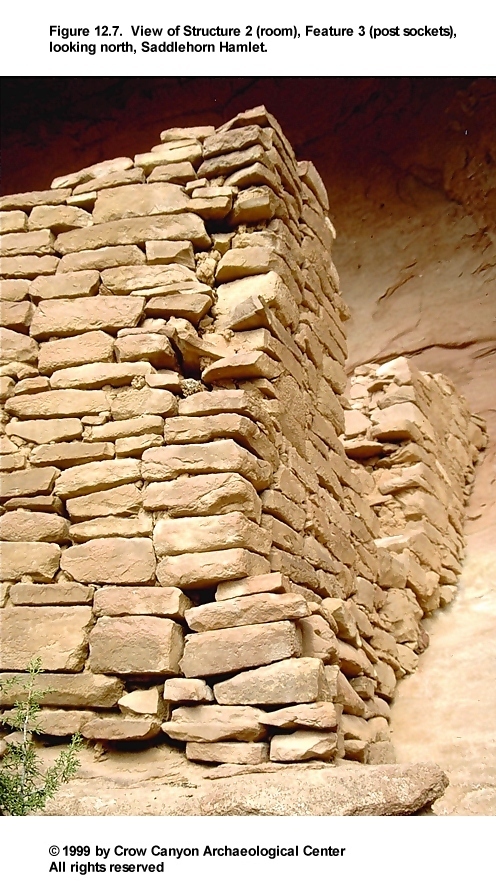
Feature 3 (Posts): This feature consists of two post stubs that extend outward from the south exterior wall of Structure 2 (Figure 12.7). The post sockets are located 12 cm apart near the southeast corner of the room, approximately 1.05 m above the base of the room. The stubs are 4 cm and 6 cm in diameter, and they extend out from the wall 4 cm and 15 cm, respectively. It is possible that these posts were tied into the upper wall of a masonry structure constructed directly below the alcove. This possible room is discussed in the section describing Sampling Strata 2 and 3 excavations.
Floor. Because the room was not excavated, its surface was not observed. However, the natural base of the alcove slopes, so it is likely that the structure contains some intentional fill below the floor.
Roof. No evidence of a roof was observed. If a roof existed in the past, it was probably supported by the walls. Alternatively, the alcove ceiling may have served as a roof.
Interpretations
This masonry room is inferred to date to the Pueblo III occupation of Saddlehorn Hamlet because it is spatially associated with the kiva. As the room was not excavated, its function is not known.
Structure 3
Structure 3 is adjacent to, and west of, Structure 2 (Figure 12.5). Its west wall, which is only partly intact, begins at the back of the alcove and runs at a slight angle toward the front; its east wall is the west wall of Structure 2. The inferred size of Structure 3 is 3.15 m by 2.6 m, which is just over 8 m² of floor space.
Construction
Walls. The east wall of Structure 3, which is a common wall with Structure 2, was described above in the Structure 2 wall discussion. The west wall of Structure 3 has a compound masonry cross section. The visible interior and exterior wall faces differ in appearance. The exterior face contains both shaped and unshaped sandstone in nearly equal numbers. The shaped stones are mostly of irregular size and shaped by flaking. The exterior face is uncoursed. In contrast, the interior wall face contains mostly shaped sandstone blocks and is semicoursed. The blocky sandstone is shaped by either pecking or flaking. Mortar used within the wall is of two types. One is a reddish yellow sandy loam; the other is a brownish yellow sandy clay. Mortar joints on average measure 1 to 1.5 cm wide. Chinking is present in most of the wall.
Floor. The foundation of the Structure 3 west wall was on bedrock, and little fill remained within the room. The room's floor was either the natural bedrock surface of the alcove or a layer of construction fill placed in the room to form a level surface. No features were observed within this structure.
Roof. No evidence of a roof was found. If a roof ever existed, it was probably supported by the walls. Alternatively, the alcove ceiling may have served as a roof.
Structures 4 and 5
Figure 12.8 is the plan view map of Structures 4 and 5, which are the remains of two dry-wall structures located on a pinnacle about 30 to 40 m above and slightly southeast of the rest of the site. The precarious position and inaccessibility of these two structures limited our ability to document them.
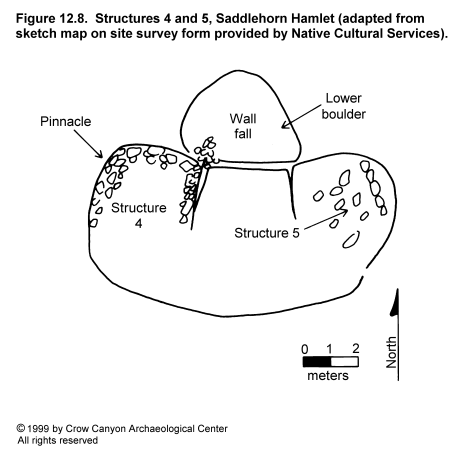
Construction
Walls. Two distinct sandstone rubble piles are present on the pinnacle, suggesting the presence of two structures. None of the remaining walls are more than .5 m high or more than 2.5 m long. All appear to be constructed of pecked-block masonry. The walls are semicoursed and a single stone thick. The exact dimensions and physical characteristics of the structures (for example, the presence of mortar, chinking, or plaster) could not be determined, because we could not scale the pinnacle. Visual observations of Structures 4 and 5 were made from the cliff top about 15 m away. Areas of the rooms could only be estimated on the basis of the sketch map provided by Native Cultural Services on the 1988 survey forms. The floor area of each structure is estimated to be 5 to 6 m².
Roof. No evidence for roofs could be discerned. Structure roofs, if they ever existed, probably were supported by the walls.
Interpretations
Despite only limited documentation, it is evident that Structures 4 and 5 provide an extensive view to the south and east. This implies that these structures were towers.
Isolated Walls
An isolated wall aligned north-south lies approximately 12 m north of the pinnacle on which Structures 4 and 5 are located. This wall measures 1.87 m long, 25 cm thick, and 21 cm high (maximum). The sandstone used in the construction of the wall includes both pecked blocks and irregularly shaped pieces. The wall stands one course high and a single stone wide on a foundation of native bedrock. Neither mortar nor chinking material are present in this wall.
A second isolated wall lies on a level spot on the cliff face 10 m above and to the east of the site. Inaccessibility made it difficult to document this wall. The wall was observed from a distance and could be seen to be three courses long, two courses high, and a single stone wide. The wall is estimated to measure about 1 m long, 35 cm thick, and 50 cm high. The wall appears to be constructed mostly of pecked sandstone blocks, and it lies on native bedrock. Neither mortar nor chinking material were observed. The function of these isolated walls is unknown.
Pit Structure and Courtyard Areas (Sampling Strata 2 and 3)
Sampling Stratum 2 is the pit structure sampling stratum, which contains 18 1-×-1-m sampling units (Figure 12.4). Two judgment and two randomly selected sampling units were excavated within Sampling Stratum 2. The two random units (110N/98E and 110N/100E) were not inside the pit structure. These excavations located rodent disturbances near the base of the sampling units that contained evidence that a structure was nearby; charcoal within these disturbances suggested that a burned structure was present. Judgment units 107N/100E and 108N/100E located a burned pit structure, Structure 1.
Sampling Stratum 3 contains 49 1-×-1-m sampling units. This is the area surrounding the pit structure that was interpreted as the courtyard (Figure 12.4). Excavation revealed that rooms were also present. Five randomly selected and two judgmentally selected 1-×-1-m units were excavated in Sampling Stratum 3.
Two of the Sampling Stratum 3 random squares (105N/100E and 106N/100E) landed in the pit structure and therefore were provenienced as Structure 1. Another sampling unit (109N/104E) exposed a masonry wall; to further investigate the wall, a judgmental unit (109N/103E) was placed adjacent to the random unit. Two other random squares (111N/95E and 105N/103E) exposed courtyard stratigraphy. An additional judgmental unit (106N/103E) tested for a possible wall beneath a rubble pile; no wall was found, however.
Additional judgmental testing took place in Sampling Stratum 3. This consisted of trowel scraping and sweeping in the area in search of walls. This was conducted to estimate the number of surface rooms at Saddlehorn Hamlet.
Description of the Sampling Strata 2 and 3 sampling units follows. Those in the pit structure (both Sampling Strata 2 and 3) are discussed under Structure 1. The remaining sampling units are discussed individually under the sampling stratum in which they were located. Finally, the features discovered during wall tracing are described.
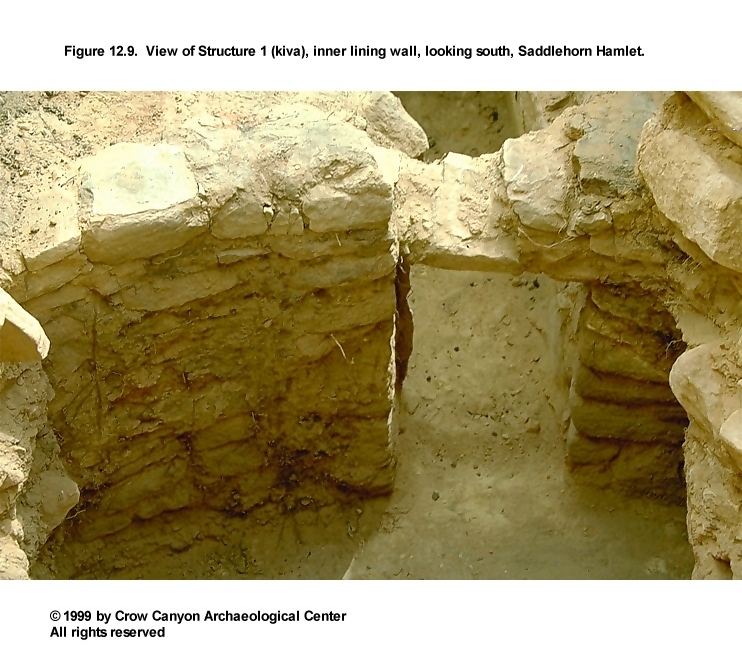
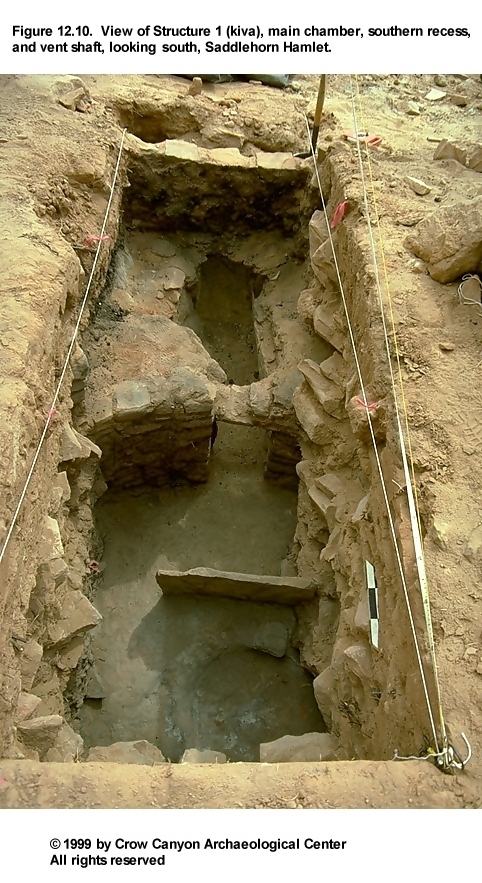
Structure 1 (Kiva)
Figure 12.9, Figure 12.10, and Figure 12.11 show the excavation units in Structure 1. The estimated position of the pit structure based on surface remains was slightly to the northwest of its real location. The first evidence of a pit structure at Saddlehorn Hamlet was found in a sampling unit (105N/100E) within Sampling Stratum 3, the courtyard stratum.
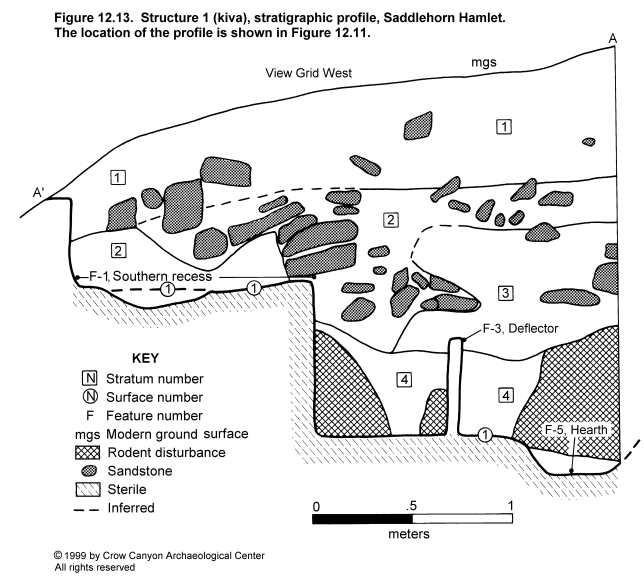
Structure 1 is a masonry-lined kiva that burned when it was abandoned. Four contiguous sampling units, forming a 1-×-3.5-m trench along the 100E line, were excavated to the floor of the kiva. This trench exposed portions of the main chamber including sections of the southern recess, a pilaster, the deflector, the hearth, and the entire ventilation system. The apparently circular main chamber is inferred to be about 3.6 m in diameter, with a floor nearly 2 m below the modern ground surface.
Construction
Walls. Although only partly excavated, Structure 1 appears to be entirely lined with sandstone masonry. The bench face is 20 cm thick and measures 88 cm high from the floor to the surface of the southern recess. This semicoursed wall is nine courses high and a single stone thick. Building materials consist of well-shaped, pecked sandstone blocks that were plastered with at least three coats on their interior visible faces. Mortar joints between the courses of sandstone measure between 1.5 and 2 cm. The wall lies on native sterile sediments. The plaster coating covers the masonry, so it is not known if chinking was present.
The construction of the outer wall, as revealed in the excavation of a portion of the southern recess, is similar to that of the inner wall. The outer wall is semicoursed, a single stone wide, and 15 cm thick. The wall is five courses high, with a maximum height of 48 cm. Several coats of plaster cover 80 percent or more of the interior face of this wall, obscuring construction details. Further description of the outer wall is found below, in the descriptions of Features 1 and 2. A pilaster, Feature 4, is also associated with the Structure 1 bench and walls.
Feature 1 (Bench 6): Bench 6 is the southern recess. A 1-m-wide portion from the front to the back of Bench 6 was excavated. This distance measures 1.2 m. Excavation exposed the outer wall of the kiva, the bench surface, and the vent tunnel beneath the bench surface. The outer wall is a semicoursed, single-stone-thick (15 cm) sandstone wall that stands five courses, or 48 cm, high. The interior face of this wall is of pecked-block construction, and it is plastered. Several preserved coats of blackened plaster remain intact. The exterior of the wall is joined to the masonry of the vertical vent shaft, which suggests that the two were built together. The surface of the bench consists of a thin lens (1 mm) of black soot overlying an adobe plaster that measures 2 to 3 cm thick. Artifacts found on the bench surface include one Indeterminate Local Corrugated Gray sherd, one piece of chipped-stone debris, a bone awl fragment, and several animal bones. A burned roof fall layer covers this surface. Refer to the discussion of Feature 2 (the ventilation system) for additional details of Bench 6 construction.
Feature 4 (Pilaster 6): Only a corner of Pilaster 6 was revealed during excavation of Structure 1. Six courses of well-shaped, pecked sandstone blocks were present; the exposed portion measured 65 cm in height. Traces of blackened plaster suggest that the pilaster was once entirely plastered.
Feature 2 (Ventilation System): The Structure 1 ventilation system consists of a vertical vent shaft and a horizontal tunnel. The vertical portion is D-shaped, joins the outer wall of Structure 1, and measures 42 cm east-west by 37 cm north-south. It is 93 cm deep. The shaft was constructed by mortaring flaked sandstone in a column adjacent to the outer wall of the kiva. The base of the outer wall lies on the surface of the southern recess, and this is where the vent shaft meets the top of the horizontal tunnel. With the exception of several large pieces of charcoal (collected as tree-ring samples, PLs 1, 2, and 3) found in the upper fill, the vent shaft contained only postabandonment, naturally deposited fill. The horizontal section of the ventilation system is located beneath the surface of the southern recess and enters the main chamber of Structure 1 in a space left in the inner lining wall of the kiva. This tunnel measures 1.35 m in length from the inner lining wall to the exterior of the kiva's outer wall. It is an average of 32 cm wide and is lined on both sides with large sandstone slabs. Its depth is 60 cm from the prepared surface to the roof covering.
The construction of this tunnel is believed to have proceeded as follows. Following the construction of the inner lining wall of the kiva, a rectangular area south of the main chamber was excavated to the same depth as the kiva floor. The southern recess and ventilation system was constructed within this area. A tunnel opening, 28 cm wide, was left in the south side of the inner lining wall. A trench was dug 1.35 m long, 35 to 40 cm wide, and approximately 22-cm deep below the base of the excavated area. The sides of the trench were lined with several large sandstone slabs. The slabs extend well above the top of the 22-cm-deep trench. Next, the surface of the vent tunnel was formed by filling the trench with construction fill. The construction fill was also placed outside of this trench to the tops of the vertical sandstone slabs. This sediment would eventually fill the entire area below the southern recess surface and south wall of the southern recess. The unfilled area between the vertical slabs became the vent tunnel. The vent tunnel may have been roofed with wood and adobe in a manner similar to that used for the tunnel opening.
The tunnel opening was roofed as follows. Charred stubs of wood were found between the sixth and seventh stone courses of the inner lining wall. Above these wood stubs and over the tunnel opening in the inner lining wall were sandstone slabs (4 cm thick) topped with adobe mortar. In total, these roof-construction materials measured about 20 cm thick and formed the surface of the southern recess above the vent tunnel. It is probable, although not observed during excavation, that the tops of the sandstone slabs lining the sides of the vent tunnel supported the cross beams that held up the roof of the tunnel.
Fill within the vent tunnel was the same as that found within the main chamber, but in reverse stratigraphic order. The roof fall stratum was found overlying natural fills. Although it is believed that the roof was burned at abandonment, it probably took a period of time for the roof of the tunnel and the burned roof fall layer above it to collapse into the ventilator tunnel. Erosional sediment was filling the ventilator tunnel through the ventilator shaft during the period immediately after the abandonment of the structure.
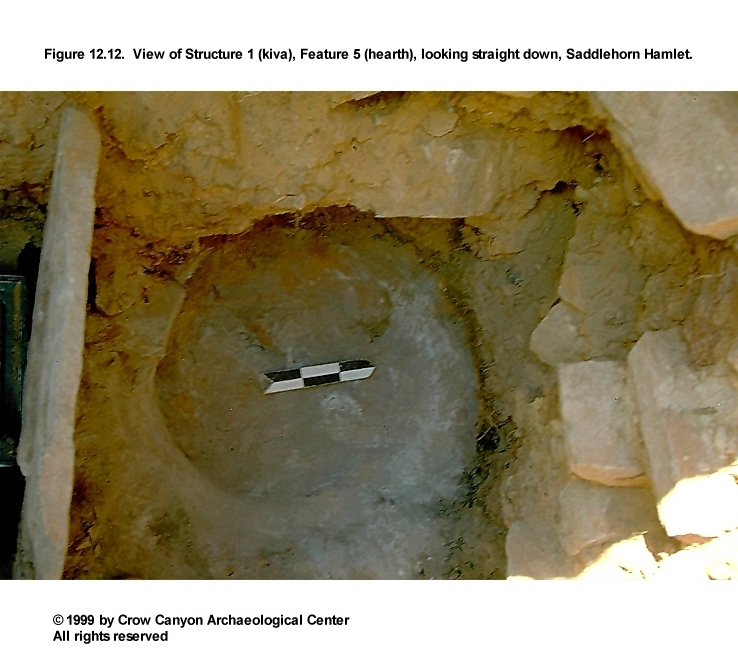
Floor. The floor of the main chamber is a use-compacted surface with a thin black sooting overlying native sediments. There was no indication that the floor was prepared. Artifacts found on the floor surface were sparse; only two sherds, two pieces of chipped-stone debris, and a complete two-hand mano were found. The mano rested against the south side of the deflector. The sherds were identified as Indeterminate Local Corrugated Gray and Mesa Verde Corrugated Gray. A pollen sample was collected from under the mano. Analysis of the sample determined the presence of a variety of arboreal and nonarboreal plant pollen. Cruciferae, Rosaceae, Umbelliferae, and Zea are economic taxa that were present in the floor sample but were absent or scarce in the upper control sample. Cheno-am pollen was found in the floor sample, but in much smaller quantities than in the upper control. Two features, the hearth and the deflector, were located on the floor of Structure 1.
Feature 3 (Deflector): A vertical-slab deflector is located 10 cm south of the rim of the hearth and 72 cm north of the horizontal vent tunnel. The deflector is a 4-cm-thick sandstone slab set into the floor of the kiva. The deflector measures 50 cm high above the floor surface and 76 cm wide. A small portion of the deflector, although excavated, was located outside and to the west of the test trench.
Feature 5 (Hearth): The hearth is a circular-shaped pit excavated into the floor of the kiva (Figure 12.12). It measures 84 cm in diameter and 21 cm deep. Small portions of the hearth, although excavated, are located outside the test trench to the north and west. Hearth fill consisted of two strata. The upper stratum, up to 8 cm thick, consisted of a burned roof fall layer that was deposited when the structure burned. The lower stratum, 4 to 12 cm thick, consisted of a gray ash deposited during the use of the hearth. Two 1-liter flotation samples were collected from the hearth ash. Found in those samples were charred parts of Juniperus, Pinus, Populus/Salix, Zea mays, Amelanchier/Peraphyllum, and Opuntia. Artifacts in the hearth include one piece of chipped-stone debris, an igneous rock fragment with polished edges, and an animal bone. A tree-ring sample collected from the hearth provided a noncutting date of A.D. 1207.
Stratigraphy
Figure 12.13 illustrates the stratigraphic profile of Structure 1. Structure 1 was excavated in four strata. The upper three strata are similar and result from natural, postabandonment structural collapse and wind and water deposition. The sediment within these three strata consists of a fine-grained, brown silt loam to sandy loam, measuring nearly 1.5 m thick within the inner lining walls of the kiva. Stratum 2 differs from the strata above and below in that it contains a greater quantity of sandstone inclusions with clay intermixed. The clay content and the shaping on the sandstone pieces suggest a collapsed masonry wall. Although the original position of this masonry wall is unknown, it is assumed that it once belonged to a surface room that stood adjacent to (north of) the kiva. Artifacts within Strata 1, 2, and 3 include 178 sherds, 15 pieces of chipped-stone debris, two animal bones, a one-hand mano fragment, a core, and a modified stone (a possible pendant). The pottery assemblage consists of 134 Indeterminate Local Corrugated Gray, three Mesa Verde Corrugated Gray, 15 Pueblo III White Painted, one Late White Painted, and 25 Late White Unpainted sherds.
Stratum 4 is a burned roof fall layer that covers the floor and is 60 cm thick. It consists of dark brown sandy loam intermixed with many large charcoal pieces and adobe roof casts. Artifacts and sandstone pieces were scarce. This stratum was also very rodent disturbed. Burrows were evident in nearly half of the profiled fill in the main chamber. Over 90 tree-ring samples were collected from Stratum 4. Their locations and sizes were mapped to allow us to observe patterns that might aid the interpretation of dating results. One flotation sample and 11 vegetal samples were also collected from Stratum 4. Artifacts found in Stratum 4 include 66 sherds, five tools, three pieces of chipped-stone debris, and four animal bones. The tools include a small edge-shaped sandstone slab, a core, a bone awl, and a modified sherd. The sherds found were 58 Indeterminate Local Corrugated Gray, one Mesa Verde Corrugated Gray, two Mesa Verde Black-on-white, one Pueblo III White Painted, one Late White Painted, and three Late White Unpainted.
Dating
More than 90 tree-ring samples and one archaeomagnetic sample were collected from Structure 1. The archaeomagnetic sample taken from the hearth yielded a range of A.D. 1200-1375 for the occupation of Saddlehorn Hamlet. Table 12.1 lists the results of tree-ring analysis. A cluster of cutting dates between A.D. 1229 and 1232 suggests that Structure 1 was constructed after those dates. The latest date, a noncutting date of A.D. 1256, indicates that construction or remodeling occurred sometime after that year.
Interpretations
Structure 1 is a masonry-lined kiva with a burned roof. The position of the roof fall directly on the floor suggests that the roof was burned deliberately when the pit structure was abandoned. Wilshusen (1986, 1988a) uses data from the Dolores Archaeological Project and Glennie's (1983) experimental pithouse burning to conclude that many of the burned pit structures found in the Dolores Project area were burned intentionally rather than accidentally. Research by Lightfoot (1987) and Varien and Lightfoot (1989) at the Duckfoot site reinforces Wilshusen's conclusion; three burned pit structures at Duckfoot are interpreted as having been deliberately destroyed. Other examples of deliberately burned kivas occur in Architectural Blocks 100, 500, 1000, and 1200 at Sand Canyon Pueblo (Bradley 1993).
The scarcity of artifacts in the roof fall and on the floor of Structure 1 suggests that the inhabitants of Saddlehorn Hamlet salvaged artifacts when the structure was abandoned. This would imply that they abandoned the site and moved elsewhere in the region and were not part of the general abandonment of the Mesa Verde region. However, this is conjecture based on limited evidence; the site and structure were only partly tested.
Structure 1 is of average size and lacks the characteristics of complex kiva architecture (such as the blocked-in kivas at Sand Canyon Pueblo). This suggests that Structure 1 did not serve as an integrative structure for a group larger than that which inhabited the site. Instead, it probably had a generalized function that included both ritual and domestic activities for a household-size group.
The dated tree-ring samples recovered from the burned roof fall layer of Structure 1 suggest that the structure was constructed soon after A.D. 1232.
Probability Sampling Units
Sampling Units 110N/100E and 110N/98E
These excavation units lie just below the two rooms built into the alcove. Excavation took place in two strata down to native sediments. The upper fill, Stratum 1, was a naturally deposited silt or sandy loam measuring 60 cm to 1 m in thickness. Contained within Stratum 1 were inclusions of shaped and unshaped sandstone pieces, charcoal pieces, and artifacts. The shaped sandstone pieces likely originated from the masonry walls of the structures in the alcove above. Excavation encountered the underlying sterile sediment at a greater depth on the south sides of the squares. Sterile sediment was found between 25 and 30 cm below the modern ground surface on the north sides of the units and was approximately 1 m deep on their south sides.
Stratum 2, encountered near the base of each excavation unit, measured approximately 25 cm thick. This stratum, although of the same color and texture as Stratum 1, contained more cultural materials, including artifacts, charcoal, and vegetal remains. The vegetal remains consisted of a quantity of pinyon nuts and nesting materials apparently associated with rodent activity. The presence of charcoal suggested the existence of a burned structure nearby.
In 110N/98E, excavation revealed several sandstone pieces piled on top of each other, possibly the remains of a masonry wall. The sandstone lay on the sterile native sediment on the north end of the square.
Interpretations. The steeply sloping sterile layer underlying 110N/100E and 110N/98E may have been natural, but it may have been prehistorically altered as well. The cliff face to the north is the Dewey Bridge member of the Entrada formation. This sandstone is very soft and easily broken apart, even without the use of tools. The construction of a pit structure in this area may have altered the prehistoric ground surface. The sediments excavated in these sampling units are interpreted as naturally deposited sediment that accumulated after site abandonment. The sandstone found in these sampling units is interpreted as wall fall from the structures in the alcove. Charcoal from the base of these units is believed to be associated with the burned pit structure, Structure 1.
Sampling Unit 111N/95E
This sampling unit lies adjacent to the cliff face below Structure 3 in the alcove. Fill within 111N/95E consisted of a single stratum that measured as much as 1 m thick on its south side. Stratum 1 is a homogeneous, loosely compacted, reddish yellow silt loam. Inclusions within Stratum 1 were small quantities of both shaped and unshaped sandstone pieces, small pieces of charcoal, and artifacts. Evidence for rodent disturbance was found near the base of this unit. This fill is naturally deposited, postabandonment sediment. The shaped sandstone is interpreted as structural collapse that probably originated from the rooms in the alcove. The native sterile sediment underlying this sampling unit sloped abruptly to the south, similar to the sterile stratum in sampling units 110N/100E and 110N/98E.
Sampling Units 105N/103E and 106N/103E
These two units consist of one random and one judgmental square situated just south of a sandstone rubble pile near the northeast corner of the site. Fill within the random square (105N/103E) consisted of two strata above a native sterile layer composed of large sandstone boulders. This sterile layer was located from 1.1 to 1.28 m below the modern ground surface.
Stratum 1 was a relatively thin layer of naturally deposited sediment covering Stratum 2. Thickness varies from 8 to 24 cm. Sediments were a loosely compacted, structureless, red brown sandy loam. Inclusions in this stratum consisted of small, unshaped red stones that eroded from the Dewey Bridge member of the Entrada Sandstone, and an occasional artifact or fleck of charcoal. Stratum 2 was a loosely compacted, red brown, gravelly sandy loam that was disturbed by rodents at its base. It was slightly over 1 m thick. Inclusions consisted of the same unshaped red stones as found in Stratum 1, although they were more common and larger than the Stratum 1 inclusions. Artifacts and charcoal were scarce.
Interpretation of the fill within 105N/103E is difficult. Either Stratum 2 was natural, with the cultural materials present due to rodent activity, or it was prehistoric backfill that was deposited during the construction of the pit structure.
Sampling unit 106N/103E is a judgmental square excavated to search for a masonry wall. Excavation stopped when it was clear that no wall was present. Although the square was only partly excavated, fill within 106N/103E was observed to be similar to that found in 105N/103E.
Sampling Units 109N/103E and 109N/104E
These two sampling units, one random (109N/104E) and one judgmental (109N/103E), lie in the northeast corner of the site just north of a sandstone rubble pile. Excavation located the base of a masonry wall and what may be the floor of a surface room. Stratum 1 was excavated in both sampling units. Stratum 2 fill, found below the suspected floor, was excavated only in 109N/104E.
Stratum 1 consists of a loosely compacted brown sandy loam containing large amounts of shaped sandstone originating from a collapsed masonry wall. The depth of Stratum 1 varies from 45 to 65 cm below the modern ground surface. The base of Stratum 1 is at the level of the inferred floor. Artifacts and charcoal were minimal.
Stratum 2 is a loosely compacted, yellowish red sandy loam that contains a few small sandstone and charcoal pieces but no artifacts. It measures about 20 cm thick and lies on either native sediment or bedrock. Stratum 2 is interpreted as subfloor fill that was severely rodent disturbed.
The masonry wall found upon excavation of Stratum 1 extended across the northern sides of both sampling units for a length of 1.5 m. At the wall's western end in 109N/103E, a large rodent disturbance made it impossible for us to determine whether the wall extended further in that direction. The wall is a single stone thick (about 25 cm) and is three courses, or 44 cm, high.
In 109N/104E, a large rodent burrow also undermined the eastern extent of the wall. The disturbance removed all traces of the floor which was believed to exist at the base of the wall. In 109N/103E, at the base of the wall, there was a subtle change of fill and an increase in the quantity of artifacts which may indicate the presence of a floor. The possible floor is a thin lens of clean sand that measures no more than 2 mm thick. The artifacts found at that level were collected as floor artifacts. Because 109N/103E was a judgmental square, excavation did not continue below the floor.
Wall Tracing
The masonry wall in 109N/103E and 109N/104E suggested the presence of a surface room. To determine the location and size of that room, it was necessary to conduct some limited testing. This testing procedure was accomplished by trowel scraping and brushing to follow wall alignments. In this manner, the approximate shape of one room was delineated, and an additional wall of an adjacent room was defined (Figure 12.5).
The first wall uncovered in this manner was easy to define. It had been partly exposed in sampling unit 109N/104E and on the modern ground surface adjacent to that grid square. This wall extended from the northeast corner of 109N/104E for 1 m to the northeast where it abutted the cliff face that bounded the site.
Another section of masonry wall was exposed northwest of sampling unit 109N/103E. This section of wall was not as easy to define. It abutted the cliff face directly below the southeast corner of Structure 2 in the alcove and extended for nearly 2 m to the southeast. The wall at that location seemed to be arcing toward an intersection with the wall exposed in grid squares 109N/103E and 109N/104E. However, it could not be traced any further without extensive testing.
These two sections of exposed wall, together with the masonry wall found in sampling units 109N/103E and 109N/104E, define the location of a surface structure. This structure was inferred to be approximately 4 m² in area and was bounded on its north and east sides by the cliff face.
Another short section of wall was found abutting this probable surface structure. This lies immediately below the southeast corner of Structure 2 in the alcove. The exposed section of wall extended for less than 1 m west of the inferred surface structure; the presence of a pinyon tree obstructed further testing. Still another remnant of a masonry wall was located 2.5 m to the west in sampling unit 110N/98E. Both sections of wall were oriented east-west, and both were parallel to the cliff face. It seems likely that these two wall sections were once connected, forming another surface room. Additional evidence supports this interpretation. Posts protruding from sockets in the southeast exterior corner of Structure 2 suggest a construction that tied the alcove room with a structure below and adjacent to it. Construction of this room would have been accomplished by building a masonry wall and abutting it to the cliff face with short cross walls. The upper courses of masonry would have been supported by tying into the posts protruding outward from Structure 2.
To summarize, wall tracing in Sampling Stratum 3 revealed the presence of two probable surface rooms in the area below the alcove, adjacent to the kiva, Structure 1. The larger room is inferred to contain about 4 m² of floor space; the smaller room is approximately half that size.
Midden Area (Sampling Stratum 5)
Sampling Stratum 5 is the site midden, which was recognized on the modern ground surface on the basis of soil color (darker than the surrounding area) and artifact density (higher than in the surrounding area). As defined on the modern ground surface, the midden extended south and southwest of the pit structure. Of a total of 131 sampling units within this sampling stratum, four were selected for investigation (Figure 12.4). Excavation demonstrated that the midden deposits were not as extensive as originally mapped and extend only to the south of the pit structure, not to the southwest.
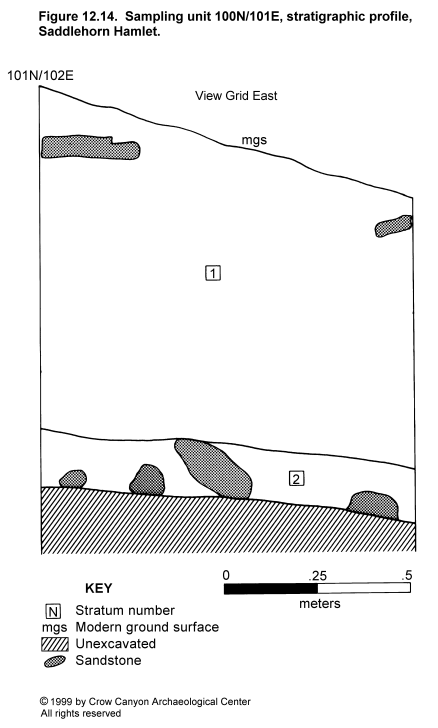
The sampling units that contain secondary refuse at Saddlehorn Hamlet were provenienced as Nonstructure 1. These include random units 104N/99E and 100N/101E from Sampling Stratum 5 and 100N/95E, 99N/95E, 98N/99E, and 97N/97E from Sampling Stratum 6. Nonstructure 1 has an inferred area of nearly 70 m² and is a maximum of 1.3 m thick from modern ground surface to sterile (Figure 12.5). The Sampling Stratum 5 units are discussed in this section; a description of Sampling Stratum 6 units follows.
Stratigraphy
Figure 12.14 is the stratigraphic profile map of 100N/101E, a typical Nonstructure 1 profile. The midden was excavated in two strata down to sterile sediments. The upper stratum, Stratum 1, is a loosely compacted, structureless sandy or silty loam. This stratum ranges in depth from 40 to 92 cm below the modern ground surface and contains most of the artifacts found in the midden. Also found in varying quantities and sizes were sandstone, charcoal, burned adobe, and concentrations of ash. The charcoal pieces, if large enough, were collected as tree-ring samples. Two tree-ring samples provided a noncutting date of A.D. 1162 and a cutting date of A.D. 1237. The ash concentrations were sampled for flotation analysis. Plant species found in the flotation samples include Juniperus, Malvaceae, Stipa hymenoides, Phaseolus vulgaris, Pinus, Zea mays, Purshia, Artemisia, Cercocarpus, and Fraxinus anomala. Next to juniper, Zea mays was the plant species most frequently found in the samples.
The underlying Stratum 2 contains fewer artifacts than Stratum 1. Stratum 2 ranges in thickness from 15 to 50 cm and is located just above native sterile sediments. Stratum 2 is a moderately compacted, weak-structured, reddish yellow sandy loam. Inclusions other than artifacts were rare, but small and moderate-size, unshaped sandstone pieces and charcoal flecking were present.
The two sampling units (103N/95E and 107N/91E) in which midden deposits were not found contain sediments that were deposited naturally after the site was abandoned. Both sampling units contain light brown sandy loam with varying quantities of regularly shaped sandstone. Neither contains an abundance of artifacts or ashy deposits characteristic of secondary refuse.
Artifacts
A total of 1,533 sherds, over 70 percent of the site total, was recovered from the midden, which includes sampling units within both Sampling Strata 5 and 6. All but two sherds (one Chapin Black-on-white and one Pueblo II White Painted) date to a Pueblo III occupation of the site.
Decorated white wares that date to the Pueblo III period include Late White Unpainted (N = 265), Pueblo III White Painted (N = 195), Late White Painted (N = 16), Mesa Verde Black-on-white (N = 46), Indeterminate Local White Unpainted (N = 3), and McElmo Black-on-white (N = 1).
The gray ware sherds found, which make up 65 percent of the midden total, were Indeterminate Local Corrugated Gray (N = 986), Mesa Verde Corrugated Gray (N = 5), and Indeterminate Plain Gray (N = 10). The presence of the Mesa Verde Corrugated Gray sherds and the lack of Mancos Gray or Mancos Corrugated sherds suggest that the corrugated body sherds probably come from Pueblo III vessels.
Tools found in the midden accounted for over 70 percent of the total tools found at Saddlehorn Hamlet. Complete and fragmentary stone tools include two metate fragments, one abrader, five peckingstones, 11 cores, four modified bones, six modified sherds, seven modified flakes, one two-hand mano, one awl, one polishing/hammerstone, four projectile points, one polished pebble, one possible pendant fragment, one axe fragment, one sandstone effigy, mineral samples, gizzard stones, and eggshell. In addition to these stone tools, 750 pieces of chipped-stone debris (90.5 percent of the site total) were recovered in the midden excavations.
Interpretations
The midden, Nonstructure 1, is a distinct cultural feature with boundaries that can be isolated to an area south of Structure 1. The midden encompasses at least 70 m² and has a maximum thickness of 1.3 m. The deep accumulation of trash at the site suggests that Saddlehorn Hamlet was inhabited for at least a number of years. The Mesa Verde Black-on-white and Mesa Verde Corrugated Gray sherds present suggest that the midden accumulated after A.D. 1180.
Disturbed Midden (Sampling Stratum 6)
Sampling Stratum 6 is an area within Sampling Stratum 5 that was recently vandalized (Figure 12.4). The looter's backdirt was shoveled back into the pothole and sampling units were excavated within the disturbance. This area contains 37 sampling units, of which four were selected for excavation. Excavation revealed that the looter's pit was within the midden but had not been excavated to the base of the refuse deposits. The sampling units were therefore provenienced as Nonstructure 1. These consist of random units 100N/95E, 99N/95E, 98N/99E, and 97N/97E. Artifacts found in these sampling units are combined with those found in the midden in Sampling Stratum 5 and are described above.
Stratigraphy
Deposits within the disturbed area (Sampling Stratum 6) of the midden contain an upper stratum of looter's backdirt. This stratum contains an abundance of artifacts in a brown sandy loam. Although these artifacts are from a disturbed context, it is reasonable to assume that they are from the midden. Stratum 1 measures from 15 to 95 cm thick.
Stratum 2 had not been potted and was similar to Stratum 2 in the undisturbed section of midden in Sampling Stratum 5. Stratum 2 is a moderately compacted, weak-structured, reddish yellow sandy loam. Stratum 2 contains fewer artifacts than Stratum 1 and inclusions of sandstone pieces and charcoal flecking. Stratum 2 ranges in thickness from 21 to 50 cm and is located just above native sterile sediments.
To summarize, Sampling Stratum 6 is an area of the midden that was recently looted. The upper stratum of fill was disturbed, but an undisturbed stratum was found beneath the disturbed deposits. Sampling Stratum 6 artifacts are considered a portion of the midden.
Inner and Outer Peripheries (Sampling Strata 4 and 7)
Sampling Stratum 4 is the inner periphery of the site (Figure 12.4). Sampling Stratum 4 is approximately a 3-m-wide linear band that surrounds all the other sampling strata at the site except Sampling Stratum 7. Of a total of 120 sampling units in Sampling Stratum 4, three were randomly selected for excavation. These three grid units were located close to one another near the northeast corner of the site. Two of the squares (105N/106E and 106N/107E) lie among natural talus boulders, and only portions of the units had sediments that could be excavated. The other random square (102N/107E) was on a steep slope along the edge of a small drainage that ran across the site. All had shallow deposits that were naturally deposited after site abandonment. All contained a sandy loam fill with only a few artifacts.
Sampling Stratum 7 is the outer periphery of the site (Figure 12.4). Sampling Stratum 7 partly surrounds the inner periphery and extends to the edge of the surface artifact scatter on the site. Of a total of 577 sampling units in Sampling Stratum 7, four were randomly selected for investigation. Each sampling unit lies on flat terrain either at the southwest or southeast edge of the site. All contained shallow deposits of naturally deposited, postabandonment sediment--a red silt loam with few or no artifacts. This red sediment was apparently eroded from the parent Dewey Bridge member of the Entrada formation.
Inner Periphery Artifacts
Artifacts recovered from the inner periphery were sparse. These include 73 sherds, 18 pieces of chipped-stone debris, and four tools. The pottery found in the inner periphery sampling units consists of 46 Indeterminate Local Corrugated Gray, nine Late White Unpainted, 11 Pueblo III White Painted, two McElmo Black-on-white, and five Mesa Verde Black-on-white sherds. This assemblage is predominantly Pueblo III. The following complete and fragmentary tools were found in the inner periphery: one two-hand mano fragment, one projectile point, one core, one modified sherd, and one modified flake. Some animal bone (N = 4), a gizzard stone, and eggshell were also recovered from the inner periphery.
Saddlehorn Hamlet Artifacts
Artifacts recovered from Saddlehorn Hamlet are listed in the material culture tables at the end of the chapter (Table 12.2, Table 12.3, Table 12.4, Table 12.5, and Table 12.6). A total of 2,115 sherds was recovered from the site. Only two of the sherds, a Chapin Black-on-white and a Pueblo II White Painted, dated to the pre-Pueblo III period. The rest are Pueblo III sherds. These include 1,340 gray ware sherds, 769 white ware sherds, and four sherds of unknown type. The late white ware assemblage includes 77 Mesa Verde Black-on-white, three McElmo Black-on-white, 258 Pueblo III White Painted, 33 Late White Painted, 394 Late White Unpainted, and four Indeterminate Local White.
The gray ware assemblage includes 1,320 Indeterminate Local Corrugated Gray (62.5 percent of the site total), 10 Mesa Verde Corrugated Gray, and 10 Indeterminate Plain Gray. The presence of 10 Mesa Verde Corrugated Gray sherds and the absence of Mancos Corrugated Gray sherds suggest that the corrugated body sherds probably were parts of Pueblo III vessels.
This pottery assemblage is predominantly Pueblo III. The near absence of sherds dating to other time periods suggests that there were no earlier occupations of Saddlehorn Hamlet.
Complete and fragmentary tools recovered from the site include two metate fragments, three two-hand manos, one one-hand mano, one abrader, one hammerstone, five peckingstones, two axes, five projectile points, nine modified flakes, 14 cores, one polishing/hammerstone, six other modified stones, 10 modified sherds, and four bone awls. In addition to these tools, 829 pieces of chipped-stone debris, a number of animal bones, eggshell, gizzard stones, and mineral samples were also recovered.
Nonlocal materials are very scarce at Saddlehorn Hamlet. These include two tools and six pieces of chipped-stone debris made of agate/chalcedony and one tool and four pieces of chipped-stone debris made of a nonlocal chert/siltstone. The relative scarcity of nonlocal materials found at Saddlehorn Hamlet indicates that the inhabitants did not trade with nonlocal groups.
Saddlehorn Hamlet Summary and Conclusions
Saddlehorn Hamlet is a single-component Pueblo III site. The most prominent architectural features visible on approaching the site are two partly intact rooms located in an alcove and the remains of two dry-wall structures on the cliff top above. Surface evidence indicated the presence of a midden. A burned pit structure (kiva) was also found at the site. A stratified random sample was used to test the site. Seven sampling strata were defined, and 22 sampling units were excavated.
Cultural features documented by testing include the burned kiva, a relatively thick midden, and several surface rooms located in the confined space between the kiva and the alcove rooms (Figure 12.5). At least two, and possibly three, rooms exist in this area. Therefore, counting the two rooms in the alcove and the two rooms on the cliff top above, the ratio of rooms to kivas at Saddlehorn Hamlet is at least six or seven to one. This ratio could be higher, if any of the rooms contained a second story, which is also a possibility. The room-to-kiva ratio at Saddlehorn is similar to that at other unit pueblos in the area (Lipe 1989:56). Like the other tested sites, Saddlehorn Hamlet contains surface architecture, a pit structure, and a midden. It differs from the other tested sites only in that it is located partly within a natural alcove.
Saddlehorn Hamlet is similar to other small alcove sites in the lower Sand Canyon area that have not been tested. These alcove sites offer several advantages, including excellent solar exposure in the winter, less labor investment in site construction, and protection from the elements. The rock faces at the backs of the alcoves would have provided natural walls for the structures built against them. The tops of the alcoves could have served as roofs to the structures built within them. Gleichman and Gleichman (1989) identified 11 cliff dwelling or alcove sites in a limited survey near the mouth of Sand Canyon. Many more are present in the Sand Canyon locality.
Tree-ring dates for the burned kiva indicate that the structure was built sometime after A.D. 1232. The latest date, a noncutting date of A.D. 1256, indicates that construction or remodeling occurred sometime after that year. This interpretation is supported by the archaeomagnetic date obtained for the kiva hearth and by the types of pottery found at the site. Only two out of 2,115 sherds recovered were pre-Pueblo III sherds.
The burned roof which seals the floor suggests that the kiva was intentionally burned, possibly ritually. The paucity of artifacts on the floor and in the roof fall stratum suggests that the inhabitants of Saddlehorn Hamlet did not abandon the region when they abandoned the site. Possibly they moved to one of the nearby larger sites in the area such as Castle Rock Pueblo or Sand Canyon Pueblo, salvaging usable tools when they abandoned the site.
The relatively thick midden at the site suggests that Saddlehorn Hamlet was a habitation that was lived in for a substantial amount of time. The number and types of architectural features and the thick midden suggest that the site was a year-round habitation rather than a seasonal or special-use site. Although none of the surface rooms adjacent to the kiva were investigated enough to determine their function, their various shapes and sizes suggest that they were both storage and living rooms.
The two cliff-top rooms may have been towers. From them, one has a commanding view, especially to the south and east. A tower at Mad Dog Tower (Site 5MT181), another of the tested sites, can be seen to the east. Another tower located above a cliff dwelling to the south (Site 5MT261), although collapsed now, also could have been seen by an ancient observer. The collapsed tower at Site 5MT2797, a site located just .3 km southeast of Mad Dog Tower, perhaps could have been seen as well.
The presence of towers at these sites suggests that line-of-sight visibility was important for inhabitants of these sites. It also implies that these sites were associated with one another and were likely contemporaneous. Further, the presence of towers may indicate that defense was of concern to the members of the community.